Delphiで白黒画像の輪郭抽出|ポリゴン座標の取得とVCL実装例
DelphiのVCL環境では、白黒画像から輪郭を抽出し、ポリゴン座標として取得することが可能です。
このページでは、TBitmapを用いた輪郭追跡アルゴリズムの実装例を紹介し、画像処理の基本から座標描画までをサンプルコード付きで解説します。
画像認識や図形処理に応用できます。
輪郭追跡のアルゴリズムは
画像処理ソリューション(https://imagingsolution.blog.fc2.com/blog-entry-198.html)を参考にさせていただきました。
また、ある座標が多角形の内側か外側かを調べる方法は、多角形の内と外の判定(https://delfusa.main.jp/delfusafloor/archive/www.nifty.ne.jp_forum_fdelphi/samples/00786.html)を使用させていただきました。
輪郭追跡ユニット
以下ソースコードを「UContourExtraction.pas」ファイルとしてプロジェクフォルダ内にに保存します。
unit UContourExtraction;

interface
uses System.Types, Vcl.Graphics;

type
  TRGB=record B,G,R:Byte; end;
  TRGBArr=Array[0..65535] of TRGB;
  PRGBArr=^TRGBArr;
  TAAByte=Array of Array of byte;
  TAPoint=Array of TPoint;
  TAAPoint=Array of TAPoint;

//輪郭抽出
procedure ExtractContours(var Lines:TAAPoint;bmp:TBitmap;ThreshHold:Byte=128);


implementation

//多角形の内外判定 使用させていただいたソースのURL
//https://delfusa.main.jp/delfusafloor/archive/www.nifty.ne.jp_forum_fdelphi/samples/00786.html
function PolygonExterior(x,y:Single;p:TAPoint):boolean;
var i,ct:Integer;
    nx,dx,dy,rx,ry:Single;
    n:Integer;
    pt:Array of TPoint;
begin
  if Length(p)<5 then
  begin
    result:=False;
    exit;
  end;
  if (p[0].X<>p[High(p)].X) or (p[0].Y<>p[High(p)].Y) then
  begin
    result:=False;
    exit;
  end;
  n:=Length(p);
  setLength(pt,n);
  move(p[0],pt[0],n*SizeOf(p[0]));

  ct :=0;
  for i:=Low(pt) to High(pt)-1 do
  begin
    rx:=x-pt[i].x;
    nx:=x-pt[i+1].x;
    if ((rx<0)and(nx>=0)) or ((rx>=0) and (nx<0))  then
    begin
      ry:=y-pt[i].y;
      dx:= pt[i+1].x- pt[i].x;
      dy:= pt[i+1].y- pt[i].y;
      if (rx*dy)<(ry*dx) then
        Inc(ct)
      else
        Dec(ct);
    end;
  end;
  //True:多角形内側 False:多角形の外側
  Result:=not(ct=0);
end;

//取り合えず線座標を集約
Function LineAggregation(Line:TAPoint):TAPoint;
var i:Integer;
    p1,p2:TPoint;
begin
  //点だった場合は返さない
  if Length(line)<=1 then exit;
  //線の場合はそのまま返す
  if Length(line)<4 then
  begin
    SetLength(Result,Length(Line));
    Move(Line[0],Result[0],Length(Line)*Sizeof(Line[0]));
    exit;
  end;
  SetLength(Result,1);
  Result[0]:=line[0];
  for i := 1 to High(line)-1 do
  begin
    p1.X:=Line[i-1].X-Line[i].X;
    p1.Y:=Line[i-1].Y-Line[i].Y;
    p2.X:=Line[i].X-Line[i+1].X;
    p2.Y:=Line[i].Y-Line[i+1].Y;
    if (p2.X<>p1.X) or (p2.Y<>p1.Y) then
    begin
      SetLength(Result,Length(Result)+1);
      Result[High(Result)]:=Line[i];
    end;
  end;
  SetLength(Result,Length(Result)+1);
  Result[High(Result)]:=Line[High(Line)];
end;

//x,yを起点とした輪郭抽出
Function ExtractContour(x,y,h:Integer;var img,b:TAAByte):TAPoint;
const move:array[0..7] of TPoint=( //探索方向
        (x:-1;y:1),(x:0;y:1),(x:1;y:1),
        (x:1;y:0),(x:1;y:-1),(x:0;y:-1),
        (x:-1;y:-1),(x:-1;y:0)
      );
var movei,movec:Integer;
    MoveFlag,FinishFlag:Boolean;
    line:TAPoint;
  i: Integer;
begin
  //URLを参考 https://imagingsolution.blog.fc2.com/blog-entry-198.html
  //    方向 654
  //         7 3
  //         012

  SetLength(line,1);
  line[0].X:=x;
  line[0].Y:=y;
  b[y][x]:=1;

  FinishFlag:=False;
  movei:=0;//探索方向

  while not FinishFlag do
  begin
    moveflag:=true;
    movec:=0;//探索カウント
    while (movec<8) and moveflag do
    begin
      if ((x+move[movei].X)>=0) and ((x+move[movei].X)<=high(img[0])) and
         ((y+move[movei].Y)>=0) and ((y+move[movei].Y)<=high(img)) then
      begin
        if (line[0].Y=(y+move[movei].Y)) and (line[0].X=(x+move[movei].X)) then
        begin
          //最初の点に戻った場合
          x:=x+move[movei].X;
          y:=y+move[movei].Y;
          SetLength(line,Length(line)+1);
          line[High(line)].X:=x;
          line[High(line)].Y:=y;
          MoveFlag:=false;
          FinishFlag:=True;
        end
        else if (b[y+move[movei].Y][x+move[movei].X]<=1) and
                (img[y+move[movei].Y][x+move[movei].X]=1) then
        begin
          //有効な点が見つかった場合
          inc(b[y+move[movei].Y][x+move[movei].X]);
          moveflag:=false;
          x:=x+move[movei].X;
          y:=y+move[movei].Y;
          SetLength(line,Length(line)+1);
          line[High(line)].X:=x;
          line[High(line)].Y:=y;
          //次の探索開始方向を設定
          movei:= (movei+6)mod 8;
        end;
      end;
      if moveflag then
      begin
        inc(movei);
        if movei>High(move) then movei:=0;
        inc(movec);
      end;
    end;
    if MoveFlag then FinishFlag:=True;
  end;
  //各ピクセルに使用したフラグを立てる
  for i := Low(line) to High(line) do
  begin
    b[line[i].Y][line[i].X]:=2;
  end;
  //線座標を集約
  line:=LineAggregation(line);
  result:=line;
end;

//輪郭抽出
procedure ExtractContours(var Lines:TAAPoint;bmp:TBitmap;ThreshHold:Byte=128);
var b:TAAByte;
    x,y,i:Integer;
    sc:PRGBArr;
    img:TAAByte;
    line:TAPoint;
    extFlag:Boolean;
begin
  SetLength(b, bmp.Height);
  SetLength(img, bmp.Height);
  for y := Low(b) to High(b) do
  begin
    sc:=bmp.ScanLine[y];
    SetLength(b[y], bmp.Width);
    SetLength(img[y], bmp.Width);
    for x := Low(b[y]) to High(b[y]) do
    begin
      b[y][x]:=0;
      img[y][x]:=0;
      //★★「緑」成分が128以上か127以下かで閾値を決めている ★★
      if sc[x].G>=ThreshHold then
        img[y][x]:=1
      else
        img[y][x]:=0;
    end;
  end;
  for y := Low(b) to High(b) do
  begin
    for x := Low(b[y]) to High(b[y]) do
    begin
      if (b[y][x]<=1) and (img[y][x]=1) then
      begin
        //ポリゴン内判定
        extFlag:=False;
        if Length(Lines)>0 then
        begin
          for i := Low(Lines) to High(Lines) do
          begin
            extFlag:=PolygonExterior(x,y,Lines[i]);
            if extFlag then
            begin
              b[y][x]:=2;
              break;
            end;
          end;
        end;
        //ポリゴン外の場合
        if not ExtFlag then
        begin
          //x,yを起点とした輪郭抽出
          line:=ExtractContour(x,y,bmp.Height,img,b);
          //抽出できた場合
          if Length(line)>0 then
          begin
            SetLength(Lines,Length(Lines)+1);
            SetLength(Lines[High(Lines)],Length(Line));
            Move(line[0],Lines[High(Lines)][0],Length(Line)*SizeOf(Line[0]));
          end;
        end;
      end;
    end;
  end;
end;

end.
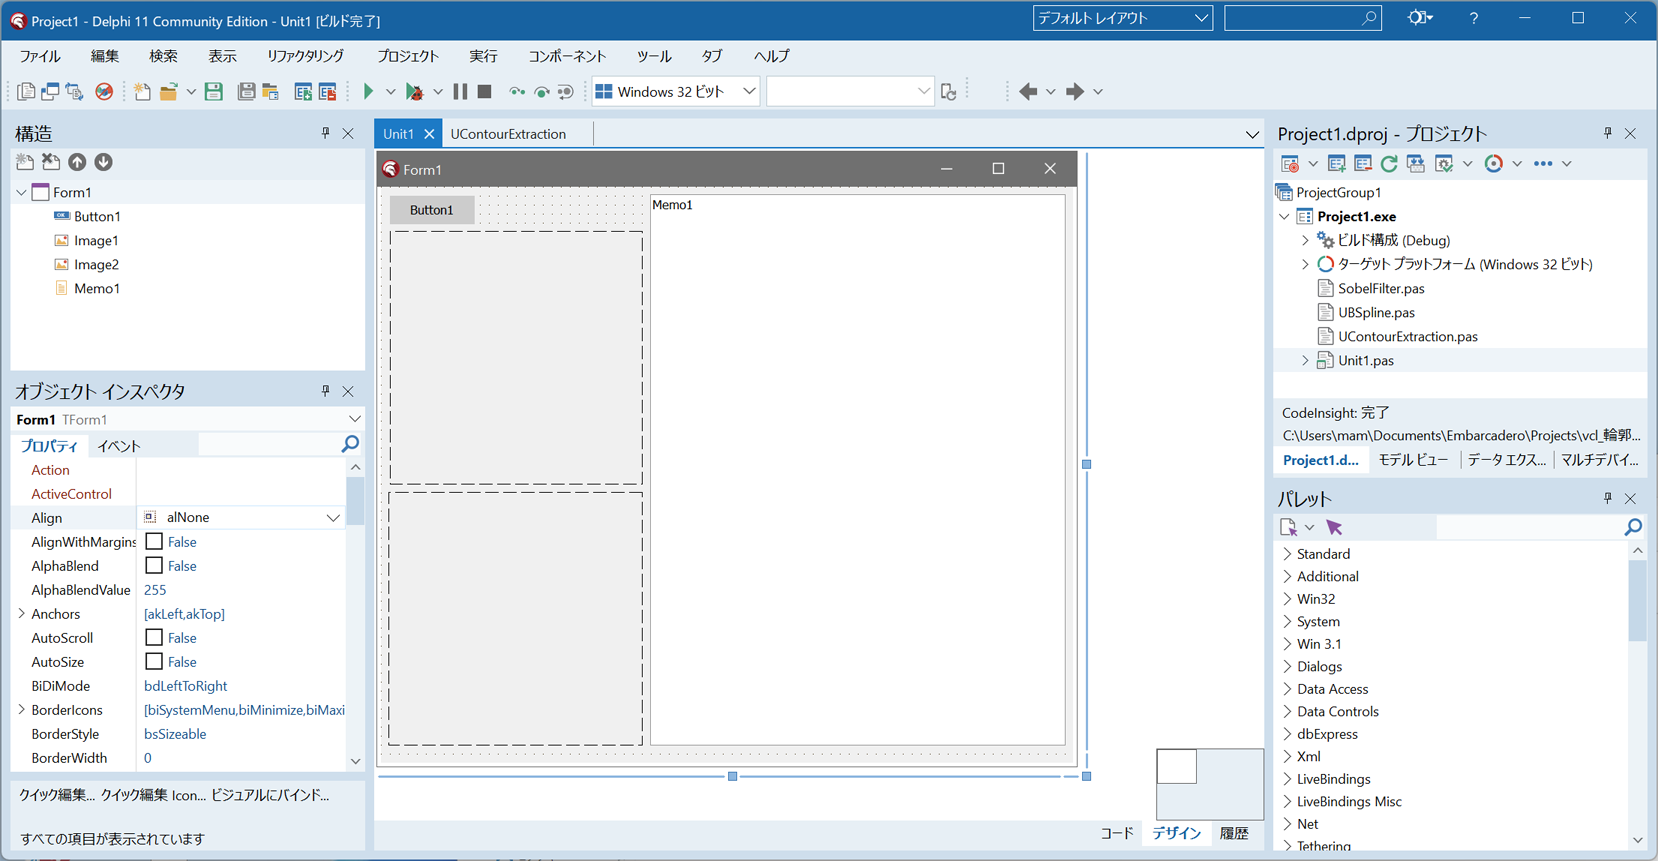
画面設計
Delphiを起動したら[ファイル]⇒[新規作成]⇒[Windows VCL アプリケーション]をクリックして新規プロジェクトを作成します。
TButton、TMemoをフォームにドラッグドロップします。
TImageを2個、フォームにドラッグドロップします。
ソースコード
Button1をダブルクリックしてソースコードを入力します。
unit Unit1;

interface

uses
  Winapi.Windows, Winapi.Messages, System.SysUtils, System.Variants,
  System.Classes, Vcl.Graphics,
  Vcl.Controls, Vcl.Forms, Vcl.Dialogs, Vcl.StdCtrls, Vcl.ExtCtrls,
  System.Types;

type
  TForm1 = class(TForm)
    Image1: TImage;
    Button1: TButton;
    Image2: TImage;
    Memo1: TMemo;
    procedure Button1Click(Sender: TObject);
  private
    { Private 宣言 }
  public
    { Public 宣言 }
  end;

var
  Form1: TForm1;

implementation

{$R *.dfm}
uses UContourExtraction;

procedure TForm1.Button1Click(Sender: TObject);
var ImgCanvas:TCanvas;
    Lines:TAAPoint;
    i,j:Integer;
    pa:array[0..2] of TPoint;
begin
  //Form1上のコンポーネントの初期設定
  Memo1.Clear;
  Image1.Picture.Bitmap.Width:=200;
  Image1.Picture.Bitmap.Height:=100;
  Image1.Stretch:=True;
  Image1.Proportional:=True;
  Image1.Picture.Bitmap.PixelFormat:=pf24bit;
  Image2.Picture.Bitmap.Width:=Image1.Picture.Bitmap.Width;
  Image2.Picture.Bitmap.Height:=Image1.Picture.Bitmap.Height;
  Image2.Stretch:=True;
  Image2.Proportional:=True;
  Image2.Picture.Bitmap.PixelFormat:=pf24bit;

  //Image1のビットマップのキャンバスを変数に入れる
  ImgCanvas:=Image1.Picture.Bitmap.Canvas;
  //Image1を黒色で塗りつぶす
  ImgCanvas.Brush.Color:=clBlack;
  ImgCanvas.FillRect(ImgCanvas.ClipRect);
  //白色で適当に描画する
  ImgCanvas.Pen.Color:=clWhite;
  ImgCanvas.Pen.Width:=0;
  ImgCanvas.Brush.Color:=clWhite;
  ImgCanvas.FillRect( Rect(100,40,160,80) );
  ImgCanvas.FillRect( Rect(160,50,171,71) );
  pa[0].X:=170;
  pa[0].Y:=50;
  pa[1].X:=180;
  pa[1].Y:=60;
  pa[2].X:=170;
  pa[2].Y:=70;
  ImgCanvas.Polygon(pa);
  ImgCanvas.Pen.Width:=2;
  ImgCanvas.MoveTo(50,30);
  ImgCanvas.LineTo(50,10);
  ImgCanvas.MoveTo(0,0);
  ImgCanvas.LineTo(3,3);
  ImgCanvas.LineTo(8,3);
  ImgCanvas.LineTo(8,0);

  //Image1に適当に描画した画像から輪郭ポリラインの取得
  ExtractContours(Lines,Image1.Picture.Bitmap);

  //ポリラインの座標を出力
  for i := Low(Lines) to High(Lines) do
  begin
    for j := Low(Lines[i]) to High(Lines[i]) do
      Memo1.Lines.Add( Format('%d,%d',[Lines[i][j].X,Lines[i][j].Y]) );
    Memo1.Lines.Add('');
  end;

  //Image2を黒色で塗りつぶす
  Image2.Picture.Bitmap.Canvas.Brush.Color:=clBlack;
  Image2.Picture.Bitmap.Canvas.FillRect(
    Image2.Picture.Bitmap.Canvas.ClipRect
  );
  //輪郭ポリラインをImage2に描画する
  Image2.Picture.Bitmap.Canvas.Pen.Color:=clWhite;
  Image2.Picture.Bitmap.Canvas.Pen.Width:=0;
  Image2.Picture.Bitmap.Canvas.Brush.Color:=clWhite;
  for i := Low(Lines) to High(Lines) do
  begin
    Image2.Picture.Bitmap.Canvas.Polygon(Lines[i]);
  end;

end;

end.
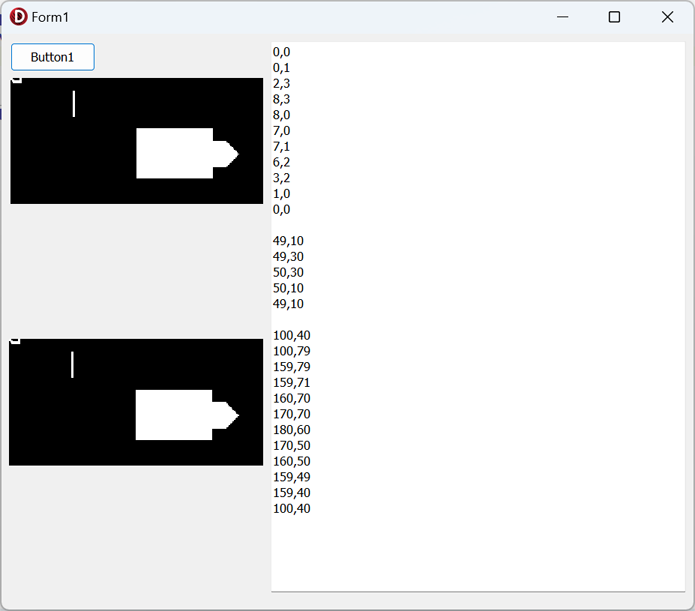
実行する
アプリケーションをコンパイルして実行します。
Button1をクリックします。
Image1を真っ黒に塗り、白色で四角形を塗ったり線を引いたりなど描画後、輪郭抽出を行いポリゴン座標を取得します。
取得したポリゴン座標をImage2に描画します。
Memo1には取得した輪郭のポリゴン座標(x,y座標の配列)が出力されます。